Thursday, May 21, 2026

A pint of demand

I recently switched to Octopus Energy and got one of their Home Mini devices, which connects to my electricity meter via ZigBee and to my home Wi-Fi to upload meter data to the Octopus servers every 10 seconds. Using their GraphQL web API, you can check your current electricity demand anytime. I've documented how to use their API to get your current electricity demand here. Much more is possible from their API but I only need the current electricity demand.

Here is a quick project to visualise your electricity demand data with a strip of 50 colour LEDs. The colour varies, purple to red, with your current electricity demand.


I'm using a Pimoroni Plasma 2350W which is a USB-C powered controller for WS2812/Neopixel addressable LED strips with 2.4GHz Wi-Fi. The Raspberry 2350W is running MicroPython v1.27. I also have a 5m Flexible RGB LED Wire (50 lights). You could use a standard Raspberry Pico 2W but the Pimoroni version has the advantage of a set of screw terminals for easily connecting the LED strip.


The MicroPython code requests your current electricity demand data from the Octopus server every 30 seconds, which, with the limit of 125 requests per hour, is about as fast as possible.

You'll need to install the latest Pimoroni MicroPython code (plasma_2350_w-v1.1.0-micropython.uf2) from here. You probably don't want the "with-filesystem" version as that one replaces any files already stored on the 2350W's file system with some demo files.

There are four files in this project. You can download them in a .zip file from here.

main.py which automatically launches OctopusElec.py when turned on
OctopusElec.py which is the main code
graphqlclient.py which makes the GraphQL requests and 
secrets.py shown below where you must enter four bits of your information.

WIFI_SSID = "Your WiFi SSID"
WIFI_PASSWORD = "Your WiFi Password"
OCTOPUS_ACCOUNT = "Your Octopus Account number in A-abcdabcd format"
OCTOPUS_APIKEY = "Your Octopus API Key"

To get the API Key click the "Generate my API key" on this Octopus page (you'll need to be logged into your Octopus account).

The easiest way of getting the code onto the Plasma 2350W is to connect it to your PC with USB and to use Thonny to copy the files onto the device. After you've modified the secrets.py file you can disconnect from the PC and power it up from any USB power socket.

Here are the steps:-
2) With a USB lead plugged into your PC power up the 2350W with the boot button pressed, it will appear as a new drive. Copy the latest firmware, plasma_2350_w-v1.1.0-micropython.uf2, onto the drive
3) Download and unzip the .zip file containing the project .py files from here
4) Edit the secrets.py file with your Wi-Fi SSID, password, Octopus account number and Octopus API key
5) Use Thonny to copy the four files (main.py, OctopusElec.py, secrets.py and graphqlclient.py) onto the 2350W
6) Press the reset button on the 2350W and it should connect to Octopus servers and start displaying your electricity demand as a colour. Logging is displayed whilst the 2350W is connected to your PC.

Near the top of OctopusElec.py there are some settings you can alter.

# ─── Configuration ────────────────────────────────────────────────────────────
LOW_W       = 100   # The lowest wattage expected (violet)
HIGH_W      = 6000  # the highest wattage (red)
REFRESH_MS  = 30000 # How often the consumption is requested. Not too fast or API will rate limit
NUM_LEDS    = 50    # The number of LEDs on the strip
ONBOARD_DIM = 0.15  # onboard LED default brightness (0‑1)

Change LOW_W and HIGH_W to set the typical demand range in your house. This might take a bit of trial and error.

Don't alter the REFRESH_MS below 30000 (30 seconds) as anything more frequent causes the API to fail with request limit exceeded errors.

If you'd like to switch to Octopus you can use my referral code for a £50 discount https://share.octopus.energy/playful-engine-680


Friday, May 15, 2026

Get real-time electricity consumption from Octopus Home Mini

I recently switched to an Octopus energy account as they provide a device to allow you to access your real-time electricity consumption from your smart meter. On request Octopus will provide a free Home Mini device which connects to your smart meter with ZigBee and to your home Wi-Fi to upload your electricity consumption every 10 seconds.

If you'd like to switch to Octopus you can use my referral code for a £50 discount https://share.octopus.energy/playful-engine-680

To access the real-time data you query the Octopus API using GraphQL format HTTPS Posts.

To start you need the following: your Octopus account number (A-AAAA1111 format) and your Octopus API Key which you can create here. The API key is like a password so don't reveal it to anyone. If necessary, you can regenerate the key using the same link.

There are 3 steps:

Step 1

Get a Kraken bearer token using the following query. The token lasts for 1 hour before a new, or refreshed, one is required.

URL

https://api.octopus.energy/v1/graphql/

Query

mutation ObtainKrakenToken {

    obtainKrakenToken(input: { APIKey: "sk_live_Your developer API key" }) {

        token

        payload

        refreshToken

        refreshExpiresIn

    }

}

Authentication

None

The result will be as shown below. You only need the text of the long token string.

{

    "data": {

        "obtainKrakenToken": {

            "token": "eyJhbGciOiJSUzI1NiIsImlzcyI6Imh0dHBzOi8vYXBpLm9jdG9wdXMuZW5lcmd5L3YxL2dyYXBocWwvIiwiamt1IjoiaHR0cHM6Ly9hdXRoLm9jdG9wdXMuZW5lcmd5Ly53ZWxsLWtub3duL2p3a3MuanNvbiIsImtpZCI6InFRb3hIbzhiTF91Wi1NdE9kQ2labDZacjFaMWsyM1l2Y0taZnU5QldHNkEiLCJ0eXAiOiJKV1QifQ.eyJzdWIiOiJrcmFrZW58YWNjb3VudC11c2VyOjEzMjMyODc3IiwiZ3R5IjoiQVBJLUtFWSIsImVtYWlsIjoiYW5kcmV3LmpvbmVzQGFscXVpc3QuY28udWsiLCJ0b2tlblVzZSI6ImFjY09090909sd09sd09s0d9pLm9jdG9wdXMuZW5lcmd5L3YxL2dyYXBocWwvIiwiaWF0IjoxNzc4ODczMjA1LCJleHAiOjE3Nzg4NzY4MDUsIm9yaWdJYXQiOjE3Nzg4NzMyMDV9.ABJbgP0gvh68SqNx-GGXGVq4_WSbZ6vqfWb9veWYV0mHojyMkW-EqMUMhVrtvIFYhyom4qbWodfnAGrNIh0akpauzCJG-6qFa8Noynuibqlu4RmoVThYbIOUGbqO6p-VQmKPACKuhimfCzntU2m_Gh2uNr8Tbsx5pqXPnGp6S10LQm1eJvrKmJ4ca1PDh53lx75zgDo-JjARKXm4M4JHbjN5D4TlfJ7fPGlrZktafYad9XwvN1DraAutB4Ur-8ogCpVo7IoBWnnN7gaJCFSEALfi03_wb6ydx-Kb0qnbpKyi-DkJYCn-8EFowQEfA2SKgHMz8nPAN0e58Cb385bS1Q",

            "payload": {

                "sub": "kraken|account-user:000000",

                "gty": "API-KEY",

                "email": "andrew@000000",

                "tokenUse": "access",

                "iss": "https://api.octopus.energy/v1/graphql/",

                "iat": 1778873205,

                "exp": 1778876805,

                "origIat": 1778873205

            },

            "refreshToken": "faff3b0d2700cc9cd6c2fc8d000000e31466dd0daea2149d4c2c68f1",

            "refreshExpiresIn": 1779478005

        }

    }

}

Step 2

You need to establish the deviceId for your electricity meter. Using your Account Number and the bearer token from step 1. I think you only need to do this once as I don't think the deviceId changes.

URL

https://api.octopus.energy/v1/graphql/

Query

query MyQuery {

    account(accountNumber"A-YourAccountNumber") {

        electricityAgreements(activetrue) {

            meterPoint {

                meters(includeInactivefalse) {

                    smartDevices {

                        deviceId

                    }

                }

            }

        }

    }

}

Authentication

The bearer token from the step 1 above


The result will be as below, you'll need your deviceId for step 3.
{
    "data": {
        "account": {
            "electricityAgreements": [
                {
                    "meterPoint": {
                        "meters": [
                            {
                                "smartDevices": [
                                    {
                                        "deviceId""00-00-00-00-00-00-00-00"
                                    }
                                ]
                            }
                        ]
                    }
                }
            ]
        }
    }
}

Step 3

To read the real-time electricity consumption you need the bearer token from step 1 and the 8 byte deviceID from step 2

URL

https://api.octopus.energy/v1/graphql/

Query

query SmartMeterTelemetry {

    smartMeterTelemetry(deviceId: "Your deviceId from step 2") {

        readAt

        consumption

        demand

    }

}

Authentication

The bearer token from step 1

Your current consumption, in Watts, is in the demand field shown below. I've been making this request every 30 seconds and the API seems happy with that.

{
    "data": {
        "smartMeterTelemetry": [
            {
                "readAt""2026-05-15T17:14:50+00:00",
                "consumption""55667150",
                "demand""700"
            }
        ]
    }
}

Sunday, February 22, 2026

PowerPoint - text wrapping in the middle of words not at the space between words

Today I had a strange PowerPoint document where the text was wrapping in the middle of words rather than at the spaces between the words. Example below


There seems to be no way to fix this within Microsoft® PowerPoint® for Microsoft 365 MSO (Version 2602 Build 16.0.19725.20058) 64-bit [the latest version].

It appears this problem is caused by the document being saved when running on a machine with Asian language support (which I don't have installed).

The solution is as follows :-

1) Save the .pptx file to a folder on your PC (C:\Temp\PPT1.pptx in my example)

2) Rename the .pptx file to .zip (PPT1.zip in my example)

3) Use "Extract All" to extract all the files from the .zip file into a set of folders (creating C:\Temp\PPT1 folder and sub-folders in my example)

4) Use Notepad++ to "Replace in Files" with "In all sub-folders" enabled and replace all latinLnBrk="1" with latinLnBrk="0"


5) Use "Compress to" to zip up the contents of the folder to a new .zip file (PPT2.zip in my example)

6) Rename the .zip file to .pptx (PPT2.zip to PPT2.pptx in my example)

7) When you open the PowerPoint file (PPT2.pptx in my example) the text will now be correctly wrapped at the spaces between the words.
That was a whole lot more complex than it should be for a Sunday afternoon!

If anyone runs into this problem frequently let me know and I'll write a small app to fix the files.


Alternative method :
  1. From PowerPoint use File>Save As and change the Save as type to "PowerPoint XML Presentation (*.xml)".
  2. Open the XML file in NotePad
  3. Choose Edit>Replace
  4. In the Find what field, type latinLnBrk="1"
  5. In the Replace with field, type latinLnBrk="0"
  6. Choose Replace All
  7. Save the file and close NotePad
  8. Open PowerPoint and use File>Open to find and reopen the XML version. Resave in the normal PowerPoint pptx format. All English text will now break normally.


Sunday, July 28, 2024

Copying files between two Dell XPS laptops using Thunderbolt 4 (USB C-USB C cable)

It turns out to be quite complicated to copy files between two Windows 11 laptops. One an Dell XPS 15 9550 and the other a Dell XPS 14 9440 both have USB C ports that support Thunderbolt 4.

I had a couple of Tb of data to copy between old and new laptop and felt a 1Gbps Ethernet connection was rather slow for this task compared with the 40Gbps offered by Thunderbolt. I suppose I could have used OneDrive but I didn't have enough space, or time, to use that method.

The first thing you need is a Thunderbolt 4 USB C-USB C cable. I had various other USB C-USB C cables (for example an Apple supplied lead for charging an iPad) but these wouldn't work. I ended up buying this one from Amazon.

When this lead connects the two laptops (it didn't seem to matter which of the 3 USB C ports I used) it shows up as a "USB4(TM) P2P Network Adapter" in Device Manager on both laptops


Configure the IP addresses
By default the Ethernet adapters get a random IP address in the 169.254.0.0 to 169.254.254.254 (SNM 255.255.0.0) range. I found I couldn't communicate between these two randomly allocated addresses - I think the lack of a default gateway prevents Windows from correctly classifying the network type and therefore essentially prevents you from using it.

From Settings>Network & Internet>Advanced Network Settings select the "USB4(TM) P2P Network Adapter" (called "Ethernet 4" in my case) and click to expand to show the details. Click "View additional properties" and "Edit" to change the IP Settings from Automatic(DHCP) to Manual. Then toggle IPv4 on and enter the IP address, Subnet mask, Gateway and Preferred DNS. 

On new laptop, the one receiving the files, I chose the settings above 192.168.1.1. The critical step is to specify the other computer's IP address (192.168.1.2) as the Gateway and DNS addresses. Without setting the Gateway and DNS the link wouldn't work. Here are the settings from the old laptop - the one holding the files.
Note on both laptops how the Gateway and DNS contains the IP address of the other laptop.

Fighting the Firewall - on the old laptop holding the files
The firewall in Windows 11, correctly, blocks almost everything by default. This is a very good thing but we need to open up some access so we can communicate between the laptops.

The first thing is to change the NetworkCategory for "USB4(TM) P2P Network Adapter" to be Private (it defaults to Public). I couldn't find a way to do this from the UI so I used PowerShell.

From a PowerShell Administrator prompt, and it must be an Administrator account, use this command to get a list of networks :-

Get-NetConnectionProfile


For the next command we need to know the InterfaceIndex of the USB4(TM) P2P Network Adapter. In my case it was 30 (as shown in the graphic above).

You then use that value with the following command to change the network type to be Private.

Set-NetConnectionProfile -InterfaceIndex 30 -NetworkCategory Private

Now enable pings through the firewall to allow the link to be tested

netsh advfirewall firewall set rule "File and Printer Sharing (Echo Request - ICMPv4-In)" new profile=private enable=yes

From a PowerShell prompt on the new laptop I can ping the old laptop with :-

ping 192.168.1.2 


Showing we can successfully ping, in one direction at least, from the new laptop to the old laptop holding the files.

With basic network connectivity proven it's time to alter the file sharing settings on the old laptop containing the files.

File Sharing Configuration - on the old laptop holding the files
From Settings>Network & internet>Advanced Network Settings>Advanced Sharing Settings you need to configure the settings as shown below. You need to remember what these were so you can turn them back once you've finished.


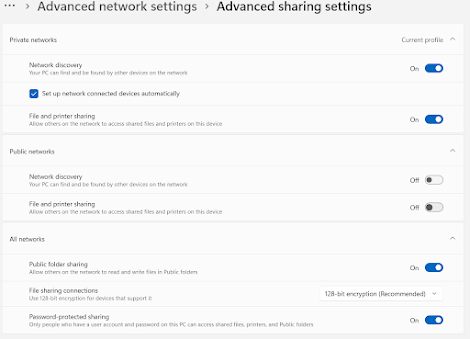
This enables files to be shared on a Private network and enables password protected file sharing.

I then created a new local administrator account (called Admin) on the old PC as my normal account is a MS Account and it can make password file sharing complicated.

Configuring File Shares on the old laptop
You now need to share each folder you wish to copy. Unfortunately you can't share the whole C: drive. In File Explorer right click on each folder and select Properties (or Alt-Enter on a folder). A new sharing tab will be available (having enabled password protected sharing above). You then click on the Share button and enter "everyone" and click "Add", "Share" then "Done".


This will give read only access to everyone (you'll need to remove these shares at the end).

You can check the folders you have shared from Computer Management>Shared Folders>Shared


Viewing the files from the new laptop
At this point you should be able to view the shared folders from the new laptop. Using File Explorer enter "\\192.168.1.2\ShareName" into the box at the top (replace ShareName with your folder name).


You are prompted for a username and password. I used my newly created admin credentials. You can now copy the files across using File Explorer.

Because I wanted to also copy the file attributes (timestamps, attributes and streams) I used TeraCopy which also elegantly handles any files that cannot, for whatever reason, be copied.


Conclusion
Well, that was hard work but at least I was able to copy the files over at about 300Mb per second which saved several days over the 1Gbps Ethernet option.

Once you have finished you probably need to remove the file shares and turn off "password protected sharing".

It should be so much easier to copy files between two machines using the same MS account!


Thursday, December 01, 2022

Setting up Windows 10/11 as an NTP Time Server

Instructions to setup a Windows 10 or 11 PC as a NTP time server :

  • Using the Registry Editor change the following two keys

HKEY_LOCAL_MACHINE\SYSTEM\CurrentControlSet\services\W32Time\Config -> AnnounceFlags = 5

HKEY_LOCAL_MACHINE\SYSTEM\CurrentControlSet\services\W32Time\TimeProviders\NtpServer -> Enabled = 1

  • Create inbound firewall rule allowing UDP port 123

  • From admin command prompt run sc triggerinfo w32time delete to clear any triggers which prevent the service from starting

  • Ensure "Windows Time" service is set to Automatic 

  • Restart "Windows Time" service

Wednesday, April 14, 2021

What Brexit really costs


We make fibre optic test systems that are used to monitor the huge power cables connecting offshore windfarms. A typical system costs between £75,000 and £100,000, we sell or rent them to our customers. Most of our customers are based in the EU and are busy building windfarms in UK waters. Before Brexit we could take our equipment in our own vehicle and install it at the customer's site, there was no admin, no costs and no customs delays. It's taken until now, mid-April, to clarify the costs for supplying rental equipment from the UK to the EU.

I've summarised the new costs and admin overhead below.

Staff

Thanks to the Trade and Cooperation Agreement (TCA) staff from the UK can work in the EU to deliver a contract between a UK and EU business. There are restrictions on the staff that can do this work, they must be over 21, have been employed for at least a year and have three years experience doing identical work. Self employed staff need six years experience. Individuals can only stay in the EU Schengen zone for a maximum of 90 days from the previous 180 (it's a personal limit that applies regardless if you are on holiday or working). To avoid having to pay National Insurance in the country you are working in you can apply for a "Certificate of continuing liability for National Insurance" - provided the UK has a reciprocal agreement with the country you are working in. All dates working outside the UK have to be reported to HMRC - all additional admin overhead not necessary previously.

Tools and Equipment

We typically travel with around £25,000 of specialist fibre optic tools and test equipment. To travel to the EU all equipment needs it's own "passport" - an ATA Carnet. The cost for an ATA Carnet is £620.50 per trip, there is a considerable admin overhead as all equipment must be itemised and listed with serial numbers along with a copy of the original invoice. All the equipment you take from the UK to EU must be returned. Nothing can be missed from the list on your return to the UK or you sacrifice the deposit. In this example the deposit is covered by insurance but without that a deposit of 40% of the full retail value (or bank guarantee for that amount) is required to be paid to the Chamber of Commerce who issues the ATA Carnet.

Shipping

Before Brexit goods and staff could travel freely around the EU transporting our own equipment. Now duties (tariffs and VAT) must be paid when crossing to or from the EU. Rules of origin and safety checks are also made as these potentially alter the payable tariff rates. To have the ability to "pre-clear" customs (to avoid sitting in a queue for as long as it takes) you must be a logistics company as only they have the software and VAT status to use the pre-clearance system. The UK government essentially allow DHL, and companies like them, to police the system on their behalf. The logistics companies are therefore quite conservative and won't touch anything that risks complications (like rentals or returns) as an error in a consignment could block or delay a whole lorry load of goods.

The cost of shipping a 300kg pallet to and from the EU by DHL is £1,765.00 and delivery takes around a week. Only logistics companies like DHL have the capability to deal with both the UK and EU customs formalities.

Tariffs and VAT

This is the big one! Being outside the EU and customs union means VAT is payable on delivery when goods are imported from the UK into the EU. In the case of the Netherlands that's at 21%. So the customer must pay 21% of £75,000 (the full retail price even though they are only renting it for a short time) before DHL will deliver the goods. That's £15,750.00 to be paid even if the customer is renting the system for just a few days. When the rental goods are returned to the UK the customer can apply for this VAT to be refunded to them, but they still have to suffer the cashflow impact as it can take a while to arrange the refund.

I've shown in red the new post-Brexit costs for UK companies delivering a project in the EU. These are considerable costs that an EU supplier would not incur.

Can someone please explain the benefit the UK gets from being outside the single market and customs union?

Saturday, March 20, 2021

Replace Changeover Valve on a Dyson DC40 - Dyson P/N 922625-03

This video shows how to replace a damaged changeover valve on a Dyson DC40. It was working OK from the hose but not sucking very well when in carpet cleaning position. The problem turned out to be a ripped changeover valve (see photo below).


I bought a replacement from Amazon for £6 (Dyson P/N 922625-03 "COV HOSE ASSY"). It's fairly easy and cheap to replace and only took about 10 minutes. The full video of the whole repair is shown below. You'll need a Torx T8 and T15 screwdriver bit (something like this).

I reckon I just saved about £300 on a new Dyson!

Please let me know how you got on if you attempted this repair.