Saturday, March 06, 2021

How to play R'Méribel, la radiostation on an Amazon Alexa (or Echo) by tapping a single iPhone button

This sounds simple but it takes quite a few steps. This is the result, a single "R'Méribel" button on the iPhone Today View screen that you click to play R'Méribel on your Alexa (the screen you see when you swipe right from the left edge of the Home Screen or Lock Screen). I'm using iOS 14.4 in these instructions, hopefully it'll continue to work in newer versions too.


First a little context. Although UK based we have a house in Méribel (a ski resort in France) which we cannot easily visit at the moment thanks to COVID. It's nice to listen to R'Méribel to remind ourselves of the good times skiing, and, for a French station, they play some surprisingly decent music in the evenings without any DJ's or too many adverts.

Step 1) First you need to install the "myTuner Radio Player App" as an Alexa skill. From the Alexa iPhone app tap the "More" button and select "Skills & Games". Tap the "Search" button and search for "myTuner Radio Player App" tap on it in the results list and then click "Enable to use".

In theory this is enough to allow you to say "Alexa, ask mytuner radio to play R'Méribel". In practice I find the apostrophe and é (accent aigu) confuse the voice recognition at least on my Alexa which is set to UK English.

The problem is the station name "R'Méribel" is a play on words, it should really be something like "Radio de Méribel" but it's been shortened to make it look and sound cooler. However, this abbreviation totally confuses the Alexa voice recognition as anything but an exact database match fails to find the station in the mytuner database of stations. I should really pop down and speak to the Alexa software developers as they are just down the road from me in Cambridge. 

Anyway, to work around this problem we'll add an Alexa "Routine" to bypass the voice recognition so the action can be triggered with a simpler phrase which is hopefully a little easier for Alexa to understand.

Step 2) Adding an Alexa Routine: From the Alexa iPhone app tap the "More" button and select "Routines". Tap the "+" button (top right). You should see this screen :
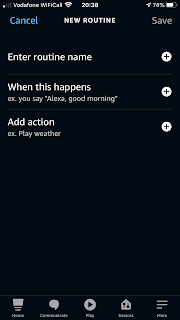
Tap on "Enter routine name" and call it anything you like, I called mine Say 'Alexa, Meribel' to remind me what the trigger phrase is.

Tap on "When this happens" and tap on "Voice". This allows you to enter a phrase to start the routine. I called mine simply "Meribel" but you can choose any phrase you prefer.

Tap on "Add action" and scroll down to "Customised". Enter the specific text "Alexa, ask mytuner radio to play R'Méribel". I've found it's critical to enter the single vertical apostrophe between the R and M (press and hold on the ' key in the iPhone keyboard to get different options) and the e as é (press and hold the e on the iPhone keyboard to get various accents). If you don't enter this precisely as shown it doesn't match to the station name and offers three almost random selections. It took me ages to work this out. Please enter it exactly as shown.

This step is important as it essentially sends the raw command "Alexa, ask mytuner radio to play R'Méribel" directly to myTuner avoiding the utterly unreliable and inconsistent voice recognition part of Alexa (which rarely works well with my grumpy voice even on a good day).

Finally tap "Choose Device" to select which device it will play on.

With these steps complete you should see this screen.

You can tap on the blue play button to trigger any of your routines. Alternatively you can say "Alexa, Meribel" to trigger the routine with a simple voice command.

I have found that occasionally nothing will play. I think this is due to a problem sending the audio feed from R'Méribel because the myTuner web page also fails to play anything at the same time. I've found there is nothing you can do other than waiting for it to start working again.

If, like me, you struggle to get Alexa to understand what you are saying it's a bit of a pain having to go into the Alexa app, press "More" then "Routines" just to tap the play button. Wouldn't it be much nicer to have a single button on the iPhone main screen?

TL;DR (too long; didn't read)
To make it really easy to setup the Alexa Routine above simply click here or point your camera at this QR Code (or tap it) and it'll do everything described above automatically.

If you're happy with this method so far you can stop at this point. If you want to trigger the Alexa action with a single tap of an iPhone button please continue.

Steps to add a button on an iPhone to trigger an Alexa routine

We need to install another Alexa skill but before we can do this you need an active https://www.patreon.com/ account. Patreon is a payment system for making small regular payments and mainly used for paying musicians or podcast creators. Don't worry, this process is FREE for a single button (you can support the developers by paying a small monthly amount if you want multiple buttons to trigger multiple Alexa actions - this can be helpful for various home automation projects). However, register a Patreon account using your email address and create a new password (don't even think of using the same password everywhere!!!). Once you've completed the registration page don't forget to click on the button at the top of the Patreon web page to send yourself a verification email. Once your Patreon account is fully verified you can continue.

Next, we need to add the "Virtual Buttons" skill to Alexa. From the Alexa iPhone app tap the "More" button and select "Skills & Games". Tap the "Search" button and search for "Virtual Buttons" tap on it in the results list and then tap "Enable to use". Right after you enable the Virtual Buttons skill you must link it to your Patreon account by entering your email address and Patreon password. At his point Virtual Buttons will send you an email with a long URL in it (from info@virtualbuttons.com - make sure it's not sent to your spam folder). You can use this URL to trigger your Alexa routine from anywhere. Keep it secret as anyone with the URL will be able to trigger the routine. The email will look something like this. We'll need the bit in yellow later.

We now need to create another Alexa routine to "Alexa, ask mytuner radio to play R'Méribel" but this time when the "Virtual Button 01" is pressed.

TL;DR
You can follow along below with the manual instructions, click here or simply point your iPhone camera at this QR code (or tap it) to automatically setup the "Virtual Buttons" routine described below.

Launch the Alexa app on your mobile device. Tap the more icon (usually lower right part of screen) and select "Routines". Tap the "+" icon in the top right corner. Tap "Enter routine name" and choose a name, I called mine "Virtual Button 01 is pressed". Tap "When This Happens", then tap "Smart Home" and choose the "Virtual Button 01" device and tap "Save". Select "Add action", then select "Customised" and enter "Alexa, ask mytuner radio to play R'Méribel". Tap "Next" in the top right corner. Tap "Choose Device", and then select the Alexa device you want to play on. Tap "Save" in the top right corner.


You can now click on the blue "Play" button next to "Virtual Button 01 is pressed" to test the new routine. It should start playing R'Méribel again.

Adding an Apple Shortcut

Finally, we are going to use the Apple Shortcuts app to create a button using the "unique access code" URL that was emailed to us from info@VirtualButtons.com (the bit in yellow in the email). The URL can be used from any device so you could for example start the R'Méribel routine by clicking on the link in the email or adding it as a favourite button in your web browser.

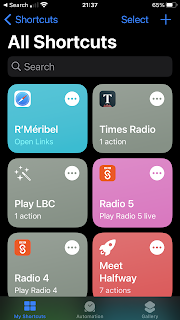
However, we are going to use the Apple Shortcuts app to create an iPhone button. Start the "Shortcuts" app on your iPhone and click on "All Shortcuts". We are going to add a "R'Méribel" shortcut like this (top left).
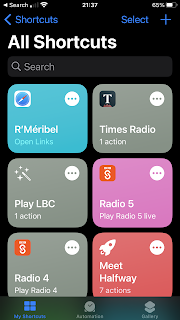

Tap on the "+" (top right) and tap "Add Action" then tap "Apps". You should have a screen something like this (the icons will depend on which apps you have on your phone) :
Scroll down and tap "Safari" and then tap "Open URLs".

You need to copy the long URL sent in the Virtual Button email and paste it where it says URL in blue. It'll look something like this when you've pasted the URL in.
Remember this URL is "secret", anyone who has it can trigger the routine on your Alexa.

Tap "Next" and enter a name for the shortcut. I called mine R'Méribel and finally tap "Done". You should have a button in the Shortcuts app that you can click on. 
When you click on the button you should see the following in the browser which confirms the action has been triggered.
The Virtual Button website does it's magic and triggers the "Virtual Button 01 is pressed" Alexa routine. This routine in turn sends "Alexa, ask mytuner radio to play R'Méribel" to the mytuner skill which should start the station playing.

One final step. Tap and hold on the "R'Méribel" shortcut button in the Shortcuts app and select "Details" from the menu at the bottom (I've found you need to tap and hold directly on top of the shortcut icon, not the three dots, to get the menu to appear). You can now tap "Add to Home Screen" to change the name and possibly the icon (as I did here - I grabbed an image from https://laradiostation.fr/r-meribel/), finally press "Add" to add the icon as a normal iPhone app button.

You can now tap on the button and all the magic happens in the background.

To get the button on the "Today View" page you need to add the "Shortcuts Widget". Scroll to the bottom of the "Today View" and tap "Edit" then the "+" top right. Search for "Shortcuts" and then "Add Widget", you can swipe to select a single, four or eight shortcut buttons. This will add a widget to the Today View which can then be customised to include multiple shortcuts.

That's it. Easy when you know how. Swipe right and tap on one button for R'Méribel!

You can use this Virtual Button technique to trigger any number of Alexa Routines. Because the shortcut is added to your iPhone you can even get Siri to trigger the routine with a voice command on your phone. I'll leave it to you to figure that one out.

You can now enjoy the view whilst listening to R'Méribel.


Sunday, September 20, 2020

Dremel 3D45

Well, here's my first 3D designed project printed with a Dremel 3D45 over the weekend. Setup was a bit annoying. It's not clear that by selecting "UK" during the initial setup it prevents use of the online remote printing tool (as the Dremel's About screen does not show the Token needed to setup the online connection). Switching the Dremel from "UK" to "US" is the trick you need to get this working.

Apart from that it takes a little bit of practice to work out what prints well and which orientation you need for best results. In the photo below I made the two trays separately and designed them to click into the moon shaped parts.

I started using Autodesk Fusion but quickly switched to Sketchup 2020 for speed. I'd not really used Sketchup much but after a weekend of playing I'm getting pretty quick at new designs.

Overall I've been impressed with the printer. The parts produced (here in standard print quality mode) are perfectly useable. Standard mode is perfectly good enough for non-seen parts. You might want to use high quality mode for visible surfaces.

The biggest learning curve is finding a design tool that you can use. 


Wednesday, July 25, 2018

How to close a RDP session but leave original user logged on

It's annoying when you make a Remote Desktop Connection (RDP) to a PC that it does not automatically reconnect the original user once your remote session has finished. I often need to do this to remotely control a Windows based bit of test equipment. I developed this script to place a button on the Taskbar of the controlled machine to close the RDP session. Provided you use this button the desktop is returned to the original user as the remote session terminates. However, if you simply close the session (as you do normally by closing the RDC window) this code does not help and the machine will, as normal,  prompt for a password before returning to the desktop.

Firstly you need to create this .bat file. I've Created mine in a folder called C:\Temp\Shutdown RDP and named my .bat file "CloseRDP.bat".

set MY_SESSION_ID=unknown
for /f "tokens=3-4" %%a in ('query session') do @if "%%b"=="Active" set MY_SESSION_ID=%%a
tscon %MY_SESSION_ID% /DEST:console /Password:YourTopSecretPassword

Firstly let me explain what this does. The second line runs the command 'query session' and extracts the session ID that is active. It puts the session ID into an environment variable called MY_SESSION_ID. The third line closes the active session (based on it's session ID number from line 2) and redirects to the console. You will have to replace YourTopSecretPassword with the password for the desktop user. Now, this is a bit of a security risk as the password is in plain text inside the .bat file but I'm afraid it does not work if you leave it out.

However there is a problem with this .bat file...it must be run with Administrator privileges otherwise it does not work. So from File Explorer right click on CloseRDP.bat and select "Copy". Then right click in some empty space in the same folder and select "Paste Shortcut". My shortcut is now called "CloseRDP.bat - Shortcut". Right click on this and select "Properties", click on the "Advanced" button and tick "Run as administrator" and click OK twice to return to File Explorer. You have now created a shortcut that runs as Administrator. You can click on this to close the RDC session and return to the desktop. Because it runs as an Administrator you will be prompted to enter the Administrator password.

In an ideal world you would be able to drag this shortcut directly to the Taskbar for it to appear as a clickable program. However for some weird reason this does not work.

To fix this a second shortcut is required! Don't ask me why just do it! In File Explorer right click on "CloseRDP.bat - Shortcut" and select "Copy". Now right click in some empty space again and select "New > Shortcut". In the "Type the location of the item box" manually type "explorer " and then press Ctrl+V to paste the name copied earlier. It should look like this:
Click "Next" and give the shortcut a name. I've called mine "Pinable CloseRDP". There are now three files in the folder that should look like this

Now the icon for "Pinable CloseRDP" has the normal boring File Explorer icon. I like to change this to something that stands out better so right click on "Pinable CloseRDP" and select "Properties". Click on the "Change Icon..." button and select one of the default icons. I normally go with the red cross. Click OK twice to return to File Explorer. File Explorer should now have three files that look like this:

Now, after all these steps, you can finally drag the "Pinable CloseRDP" and drop it onto the Taskbar. You should now have a nice clear button that you can click to close the remote session and return the desktop to the original user.

If you are really keen you could design a custom icon to make it even clearer. When you click on you new icon you will be prompted for the Administrator password, the remote session will close and the desktop will return to the local user session without any password prompt.

Good luck, there are quite a few steps but it does work well if you follow them carefully.


Friday, March 02, 2018

WPF Blurry Pixels

Today I needed to create a small control for the status bar of my app. It needs to be small to show the pass/fail status of 96 items.

I had an ItemControl displaying the 96 items as 4 rows of 24. I started with this code but it was horribly blurry and irregularly spaced.

<Rectangle Width="4" Height="4" Margin="1,1,0,0" Fill="Green" />


To get it to display nicely with no blurry edges I changed the code to this...
<Rectangle Width="3.84" Height="3.84" Margin="0.96,0.96,0,0" Fill="Green" />


It's because WPF assumes 96 pixels per inch. By changing the size to be multiple of 0.96 you can trick WPF into drawing complete pixels.


Saturday, February 24, 2018

UK Government Gateway 2FA/2SV

The UK Government Gateway now requires two factor authentication, which they call two step verification (2SV), when you login. This is a very good thing. You can download the HMRC app, receive SMS text messages (very insecure) or receive an automated phone call (quite insecure). They push you to download the HMRC app for your phone. However, I've discovered they are using industry standard Time-Based One-Time Password (TOTP) passwords (another very good thing). As a result you can use the standard Google Authenticator or Microsoft Authenticator on your iPhone instead of the HMRC app.
Simply select "Mobile App" as your authentication method in the HMRC web site to display a QR code. Scan the QR code from your mobile authenticator app and you will be up and running in seconds. No need to download the HMRC app. Generally TOTP mobile phone authentication is much more secure than text messages or phone calls. Two factor authentication by SMS text message, used by many banks, should be banned as it's highly insecure due to serious vulnerabilities with the SS7 protocol used between mobile networks. It's so insecure that NIST (US Standards body) are no longer recommending SMS text messages a part of a two factor authentication scheme. For more details see https://www.schneier.com/blog/archives/2016/08/nist_is_no_long.html. It's a shame the UK Government even offer SMS based authentication as it lends credibility to an insecure authentication method.

Monday, November 27, 2017

HP Officejet Pro 8600 Plus prints web pages very small from IOS 11

We have an HP Officejet Pro 8600 Plus which has been printing from our IOS devices perfectly well for many years. However, since upgrading to IOS 11 web pages print as a tiny image (3x5") at the top left on the page (although I suppose it does save loads of ink!). Interestingly PDF's print without any problem, the problem seems to be limited to printing from web pages. Any of the older iPhones or iPads, which cannot be upgraded to IOS 11, continue to print without any problems. Here is an example showing the IOS 11 printing on the left and IOS10 printing on the right.


I'm pleased to report that I've found a solution. Find the IP address of your printer (by pressing the network icon on the touch screen on the printer) and use a web browser to connect to the IP address shown.

Switch to the Network tab and select "Network Protocol" on the left hand side under General. Change the setting to "Enable IPV4 only", click the "Apply" button.


Now, restart the printer (I unplugged mine) and restart your IOS devices. Once you have done this you should find that you can once again print web pages at full size!

It's clearly a bug in IOS 11 with IPV6 (as IOS 10 works just fine). Come on Apple get it sorted! It's been months now and there are thousands of people reporting the same problem on the Apple and HP forums. As normal both companies are blaming each other and sending people off to perform a load of useless tests rather than admitting to there being a problem in IOS 11.

Let me know if this fixes it for you too.

Wednesday, November 08, 2017

Vodafone Sure Signal - No smoking please!

I've just had my Vodafone Sure Signal V3 blow up with a little puff of smoke. Fortunately I was sitting right next to the thing when it popped and I was able to unplug it pretty quickly! It rattled once unplugged! I opened it up and found a capacitor that had blown itself off the board. The interior was filled with smoke, see burn marks in the photos below.

I've contacted Vodafone via Twitter. Let's see what they do about it. Hopefully it's not a fire risk for others!

The label says it's an Alcatel-Lucent Model Number : 9361 Home Cell p3.0, Part Number : 3JR09113ABBA

I notice there is a big thread on the Vodafone UK Sure Signal forums with loads of people who have had exactly the same problem.


10 Nov Update
I am pleased to report that Vodafone have agreed to send a replacement SureSignal free of charge (regardless of the warranty status). It'll apparently be delivered within 3 days. Given the unit does not have a replaceable fuse I'll be plugging it into an extension block with a very small fuse fitted to the plug. In my case the old unit tripped the downstairs circuit breaker (which also has the fridge and freezer attached). Had it blown when I was not at home it could have had far greater and more costly consequences (not to mention the potential fire risk). I'm not totally comfortable with the design of the SS3 as it runs very hot, this will always shorten the life of any electronic components. However, I have no Vodafone mobile phone signal where I live (high tech Cambridgeshire) and need to use the phone for work so I have little choice but to use one. I think powering it from a power strip with a very low current quick blow fuse will be the best way to reduce the risk associated with using this product.

13 Nov Update
A free of charge replacement unit was delivered today. I've reported the fault to Trading Standards and they are contacting Vodafone to report another failed unit.

16 Nov Update
I've made a short extension lead and fitted a small 1A fuse to the plug. Hopefully this will stop the whole power circuit tripping out if (when) this new SureSignal fails.


Monday, July 03, 2017

Dell XPS 15 (9550) swollen battery

I have had a problem with a swollen battery on my Dell XPS 15 (9550). The battery swells as it fills with gas. This swollen battery pushes the trackpad up 3 or 4 mm beyond the case (see photo). The trackpad then stops working. Dell advised me to stop using the laptop and remove power from it. For safety I have removed the battery until a replacement is received. See video below


Sunday, June 05, 2016

Simple WPF app using Task and Await with .NET 4.5

Here is a simple example showing how to create background tasks in a WPF app with .NET 4.5 and above. This is so much easier than the old BackgroundWorker approach.

<Window x:Class="TestAsyncTasks.MainWindow"
        xmlns="http://schemas.microsoft.com/winfx/2006/xaml/presentation"
        xmlns:x="http://schemas.microsoft.com/winfx/2006/xaml"
        xmlns:d="http://schemas.microsoft.com/expression/blend/2008"
        xmlns:mc="http://schemas.openxmlformats.org/markup-compatibility/2006"
        xmlns:local="clr-namespace:TestAsyncTasks"
        mc:Ignorable="d"
        Title="MainWindow" Height="350" Width="525">
 <Grid Margin="4">
  <Grid.RowDefinitions>
   <RowDefinition Height="Auto"></RowDefinition>
   <RowDefinition Height="*"></RowDefinition>
  </Grid.RowDefinitions>
  <StackPanel Grid.Row="0" Orientation="Horizontal">
   <Button x:Name="ButtonStart" Content="Start" Click="Start_Click" Padding="4"/>
   <Button x:Name="ButtonCancel" Content="Cancel" Click="Cancel_Click" Padding="4"/>
  </StackPanel>
  <TextBox Grid.Row="1" x:Name="Label1"></TextBox>
 </Grid>
</Window>


using System;
using System.Threading;
using System.Threading.Tasks;
using System.Windows;
 
namespace TestAsyncTasks
 {
 /// <summary>
 /// Interaction logic for MainWindow.xaml
 /// </summary>
 public partial class MainWindow : Window
  {
  public MainWindow()
   {
   InitializeComponent();
   }
 
 
  // To allow background task to be cancelled with cts.Cancel()   
  CancellationTokenSource cts;
 
 
  private async void Start_Click(object sender, RoutedEventArgs e)
   {
   // Disable button so it can't be clicked again until finished  
   ButtonStart.IsEnabled = false;
   Label1.Text = "Start\r\n";
 
   // Setup the function to be called with updates     
   var progressUpdate = new Progress<int>(ReportProgressOnUIThread);
 
   // Create a new CancellationTokenSource and optionally set a time 
   // when the task will automatically cancel if it has not already 
   // finished.              
   int AutoCancelAfterMS = 50000;
   cts = new CancellationTokenSource(AutoCancelAfterMS);
 
   // Must be in Try/Catch to trap the OperationCanceledException  
   try
    {
    int loopTo = 10;
    int result = await MyBackgroundTaskAsync(loopTo, progressUpdate, cts.Token);
 
    // This code does not run until MyBackgroundTaskAsync finishes 
    Label1.Text += $"Final result : {result}\r\n";
    }
   catch (OperationCanceledException ex)
    {
    // Do stuff to handle the cancellation exception    
    Label1.Text +=  "CANCELLED\r\n";
    }
   catch (Exception ex)
    {
    //Do stuff to handle other exceptions       
    Label1.Text += $"Exception : {ex.Message}\r\n";
    }
 
   // Reenable Start button           
   ButtonStart.IsEnabled = true;
   Label1.Text += "Finished\r\n";
   }
 
 
  private void Cancel_Click(object sender, RoutedEventArgs e)
   {
   cts.Cancel();
   }
 
 
  async Task<int> MyBackgroundTaskAsync(int DataFromParent, IProgress<int> progress, CancellationToken ct)
   {
   int result = await Task.Run<int>(async () =>
    {
    for (int n=0; n< DataFromParent; n++)
     {
     //You cannot do this because it's running on a non UI thread
     // Label1.Text += $"{n} I don't work!\r\n";
 
     // Throw OperationCanceledException if cts.Cancel() called 
     ct.ThrowIfCancellationRequested();
 
     // Report progress back to UI thread      
     progress.Report(n);
 
     // Do the slow things in the background     
     await SlowStuff();
     }
 
    // result gets this value which is returned as final result 
    return 42;
    }, ct);
 
   return result;
   }
 
 
  async Task SlowStuff()
   {
   // Simulate some slow code. This runs on a background thread.  
   await Task.Delay(1000);
   }
 
 
  void ReportProgressOnUIThread (int value)
   {
   // This runs on the UI thread so it can update the WPF controls 
   Label1.Text += value.ToString() + "\r\n";
   }
  }
 }
 

Tuesday, November 10, 2015

Dell PremierColor Display Splitter on XPS15 9550

I've been setting up a Dell XPS15-9550 today. It comes with Windows 10 and the most awful Dell addin you have ever seen. I normally use Dell because they refrain from adding too much crapware or useless third party apps. However, this addin, enabled by default, is awful. It adds a popup menu whenever you try and drag a window (or dialog box or popup borderless window) to reposition it on the screen. It's totally unnecessary as Windows 10 already includes a perfectly good "Windows Snap" feature. The popup window is always "in the way" and when you release the mouse the window then flies off to an illogical place on the screen. Truly awful UI design.
 
Finally I've worked out how to stop it. It turns out it's a feature of "Dell PremierColor". To disable this right click on the "Dell PremierColor" icon in the notification area and select "Disable Display Splitter".
 
Why oh why are you including this enabled by default? Crazy. Please ensure it is disabled by default ASAP at it is confusing and totally unnecessary.

Wednesday, October 21, 2015

Getting field names from anonymous types using WPF DataGrid

Often it is useful to use a bit of LINQ to prepare data for display in a WPF control. Here is a very simple example. The WPF window contains a DataGrid used to display the data.

<Window x:Class="DCView.Window15"
        xmlns="http://schemas.microsoft.com/winfx/2006/xaml/presentation"
        xmlns:x="http://schemas.microsoft.com/winfx/2006/xaml"
        xmlns:d="http://schemas.microsoft.com/expression/blend/2008"
        xmlns:mc="http://schemas.openxmlformats.org/markup-compatibility/2006"
        xmlns:local="clr-namespace:DCView"
        mc:Ignorable="d"
        Title="Window15" Height="300" Width="300" Loaded="Window_Loaded">
    <Grid>
        <DataGrid x:Name="DataGrid1" AutoGenerateColumns="False" SelectionChanged="DataGrid1_SelectionChanged">
            <DataGrid.Columns>
                <DataGridTextColumn Header="Number" Binding="{Binding NumberX1}" />
                <DataGridTextColumn Header="Number x 10" Binding="{Binding NumberX10}" />
            </DataGrid.Columns>
        </DataGrid>
    </Grid>
</Window>

The data might be prepared for display with a bit of LINQ. A new anonymous type is created using field names that are then used in the WPF control bindings.

private void Window_Loaded(object sender, RoutedEventArgs e)
 {
 List<int> data = Enumerable.Range(1, 10).ToList();
 
 var query = from d in data
      select new { NumberX1 = d, NumberX10 = d * 10 };
 
 DataGrid1.ItemsSource = query;
 }

The problem comes when you respond to selection changed events. How do you get to the fields in the anonymous type. You could create a new class instead of using the anonymous type but the advantage of LINQ is it is quick and easy.

private void DataGrid1_SelectionChanged(object sender, SelectionChangedEventArgs e)
 {
 dynamic dynamictype1 = DataGrid1.SelectedItem;
 int number = dynamictype1.NumberX10;
 
 Title = number.ToString();
 }

The problem is DataGrid1.SelectedItem returns an object and you can't cast it to an anonymous type. To solve the problem you can use a bit of dynamic black magic to get to the fields in the anonymous type. The example above shows how to use dynamic to get to the anonymous fields. There is no Visual Studio Smart Completion to help but as long as the field names match it will work.

Saturday, February 07, 2015

Changing the rear light cluster on 2013 VW Sharan (VW part VAG 7N0945096G)

A Cambridge cyclist managed to smash the rear light cluster on our car on Thursday night (thanks for riding off without having the courtesy to stop!). A new one is just £73 and really quite easy to fit yourself once you know this little trick.
 
The 12V power socket slides down to reveal a single screw that holds the light cluster in place. Press the top of the 12V socket  panel and slide it downwards. 
 
Using a 11mm socket set simply unscrew the central white nut which holds the light cluster in place. Once the light cluster is unscrewed unclip the power cable and replace the light unit. Total time about 5 minutes.
 
Sorry for a slightly random blog post. Please let me know if it was helpful to you!


Thursday, September 11, 2014

The Ultimate Times Table Excel Spreadsheet!

It's that time of year again. The kids are back to school and it's time for them to learn their times tables. Please find below an Excel spreadsheet that you can use to print out a sheet of random times tables (multiplications and divisions).

To use the spreadsheet simply select which times tables should be included from the yellow cells on the first tab.

Then switch to the "Random Multiplication" or "Random Division" tab and print. Job done!
 

Wednesday, November 13, 2013

No Windows Easy Transfer on Windows 8.1

I have a new PC Windows 8.1 laptop and need to transfer the 600Gb of files from my old laptop which is also running 8.1. Frustratingly I've discovered that Windows Easy Transfer in 8.1 no longer allows machine to machine transfer of files! Apparently you are supposed to copy everything to and from SkyDrive. Well 600Gb would take months over my ADSL and I've only got 100Gb on my SkyDrive account! It seems a crazy solution to remove this feature however I've found a solution. I found an old Windows 8.0 machine and copied the whole c:\Windows\System32\MigWiz folder to the two 8.1 laptops. You can then simply run the 8.0 migwiz.exe on the old and new laptops. I'm pleased to report that the Windows 8.0 version runs fine on 8.1 and successfully copies over the files.

I really think Microsoft should put the file transfer option back in. It would also be helpful if people sold USB3 Easy Transfer cables to speed up the transfer time.

Wednesday, October 09, 2013

MessageBox.Show does not work on Windows 7 Embedded

I have the world's simplest C# Winform application. A Form with a single button. Here is the entire app.

private void button1_Click(object sender, EventArgs e)
{MessageBox.Show("Hello World", "Button Click Event");
}
Amazingly on Windows 7 Embedded the MessageBox does not display. It works on every other non-embedded version of Windows.

It turns out that Windows 7 Embedded has an option to automatically click the default button on any MessageBox. See http://msdn.microsoft.com/en-us/library/aa940743(v=winembedded.5).aspx for more details.

Strange but true!


Thursday, September 12, 2013

Dial up VPN connections fail following Win 8 to Win 8.1 RTM upgrade

I had a strange problem yesterday. I have several dial-up VPN connections that I use daily. With Windows 8 these were working fine. I upgraded the machine from Win 8 to Win 8.1 with the RTM bits. Following the upgrade none of the dial up VPN connections would work. They all reported Error 720 : A Connection to the remote computer could not be established. Other Windows 8 machines on the same network could connect to identical servers without any problem. In the end I found that rebooting the ADSL router (the one the client machines were connected to) fixed the problem. I've no idea why all the Windows 8 machines could connect but the Windows 8.1 machine refused until the router was restarted. If you come across the same problem it might be worth trying a router reboot. Let me know if it works for you.

Andrew

Wednesday, September 11, 2013

Get Libraries back in Windows 8.1

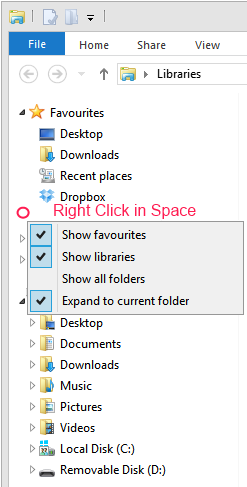
Really annoyingly the Libraries feature in File Explorer seems to be turned off when you upgrade to Windows 8.1. To turn them back on Right click in the space between folders and select "Show Libraries".

Thursday, June 13, 2013

Are you a Manager or a Leader?

Are you a manager or a leader?
  1. The manager has subordinates; the leader has followers.
  2. The manager does things right; the leader does the right thing.
  3. The manager administers; the leader continually innovates.
  4. The manager is a copy; the leader is an original.
  5. The manager maintains; the leader develops.
  6. The manager focuses on systems and structure; the leader focuses on innovation.
  7. The manager relies on control; the leader inspires trust.
  8. The manager has a short-range view; the leader has a long-range perspective.
  9. The manager asks how and when; the leader asks what and why.
  10. The manager has his or her eye always on the bottom line; the leader’s eye is on the horizon.
  11. The manager imitates; the leader originates.
  12. The manager accepts the status quo; the leader challenges it.
  13. The manager is the classic good soldier; the leader is his or her own person.
  14. The manager seeks group consensus for each decision; the leader makes decisions independently and regardless of the opinion of others.
  15. The manager assembles teams of those, like themselves, to advise on and validate every decision, leaders decide for themselves without external influence.
  16. The manager acts on expert advice; the leader has the courage to act against an expert’s advice.
  17. The manager knows the cost of everything, the leader knows the value of everything.
  18. The manager asks for a task to be performed, the leader shows the best way to do it.
  19. The manager always has someone else to blame for every mistake, the leader learns from his own mistakes.
  20. A leader takes people where they don’t necessarily want to go but ought to be.
  21. When the leader is finished with his work, the people say it happened naturally.
  22. Leaders are not team players, they feel no need to function as a group.
  23. The manager climbs the corporate ladder quickly, leaders don’t use ladders to climb.
  24. The person at the top of the org chart is rarely its true leader.
  25. Managers spend most of their time thinking they are leaders by virtue of their position.
  26. Leaders don't have all the answers whilst managers believe they do.
  27. Managers can be managed themselves, leaders can't be easily led or managed.
  28. Leaders 'begin with the end in mind.' Managers 'begin with the beginning in mind'.
  29. Leadership is freedom of action. Management is working within set boundaries.
  30. Leadership cannot be outsourced or delegated, management can.
  31. Leaders persevere until the goal is reached, managers abandon projects because they see only on the bottom line.
  32. Managers seek continuity, Leaders seeks change.
  33. Managers focus on goals for improvement. The Leader focuses on goals of innovation.
  34. Management's power is based on position or authority; Leadership power is based on personal influence and trust.
  35. The manager demonstrates skill in technical competence but the Leader demonstrates skill in selling the vision.
  36. The manager demonstrates skill in administration. A Leader demonstrates skill in dealing with ambiguity.
  37. The manager demonstrates skill in supervision. A Leader demonstrates skill in persuasion.
  38. The manager diligently seeks legal agreement at each stage of a project. A leader proceeds much more quickly by personal agreement based on trust.
  39. You manage things, you lead people.
  40. Leadership has no performance metrics, management does.
  41. Managers manage, so by nature are natural followers. Leaders lead.
  42. Management is a career. Leadership is a calling.
  43. Managers focus on the bottom line; leaders focus on adding value.
  44. Managers minimise todays costs, leaders maximise future value.
  45. Managers solve problems sequentially - step by step, leaders solve problems quicker by working in parallel.
  46. Managers take a salary, leaders work to change the world.
  47. A managers social identity is defined by title and position, a leaders identity by how he's changed the world.
  48. Without followers, there is no leader … there is just one person with a goal or idea.
  49. Managers prefer process, leaders prefer agility.
  50. The manager is SAD, the leader is MAD. SAD = Same as we've Always Done. MAD = Makes A Difference

Tuesday, August 28, 2012

Installing NVIDIA drivers on 64bit Windows 8

I upgraded a Sony laptop from Windows 7 to Windows 8 but the upgrade did not detect the Nvidia graphics chipset. I grabbed the latest Windows 8 64bit Nvidia driver from http://www.laptopvideo2go.com/ but the installer failed. It turns out that 64 bit Windows 8 will not install a driver unless it’s signed. You can disable signature checking by :

  • Windows Key + C to bring up charms menu
  • Click “Settings”
  • Click “Change PC Settings”
  • Click “General”
  • Under Advanced Start-up click the “Restart Now” button
  • Click “Troubleshoot”
  • Click “Advanced Options”
  • Click “Start-up Settings”
  • Click “Restart” button
  • Press option 7 – Disable driver signature enforcement
  • You can now install your un-signed 64bit driver

No DVD after upgrading Windows 7 to Windows 8

I upgraded my Windows 7 laptop to Windows 8 RTM but the DVD player refused to work. It's a MATSHITA BD-CMB UJ141EF drive in a Toshiba laptop. It was showing a yellow exclamation mark in Device Manager which reported the following error "Windows cannot start this hardware device because its configuration information (in the registry) is incomplete or damaged. (Code 19)". Deleting and re-scanning in Device Manager made no difference.

SOLUTION:

I noticed a service called "TOSHIBA Optical Disk Drive Service" which was presumably installed as part of the original Windows 7 setup. I used "System Configuration" to stop this service and the drive now works correctly in Windows 8.